Showing posts with label shellcraft. Show all posts

Thursday, November 26, 2009

Holiday at the beach

Thought I would share a few simple craft projects that I came up with to set my Thanksgiving dining table this year. If you're like me and love everything beachy, these will work well for any celebration, they are by no means "Thanksgiving Only", in fact, they're not really Thanksgiving-y at all! Enjoy and Happy Turkey Day! PS- sorry there are so many pictures, I tried to do step-by-step images for everyone.
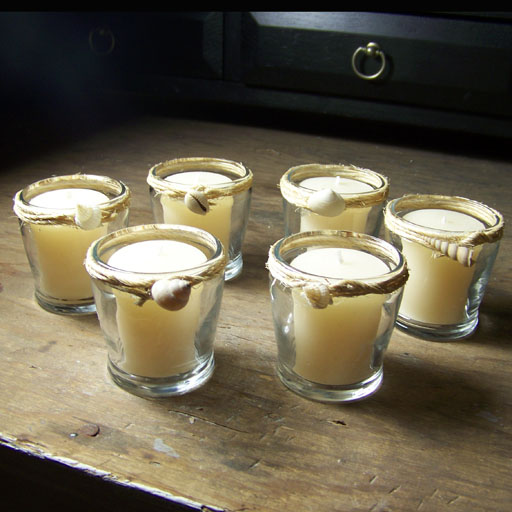
Craft #1: Decorative Seashell Votive Holders. These are SO simple and really added a nice finishing touch to my table.
Supplies:
Glass Votive Holders (purchased for $.39 each at a discount store)
Twine
Seashells
Hot Glue Gun/Glue Sticks
Scissors


First, wrap the twine around the top of the holder once, tying it in a knot to secure. You can also use a dot of hot glue if it's sliding around on you. Then simply take the ends of the twine and wrap around the holder once more in each direction giving yourself a total of 3 wraps. Give your twine a trim, hot glue a seashell in the center to cover the knot and you're done!


Craft #2: Starfish Napkin Rings. These are a bit more time consuming than the votive holders but equally as simple and they really looked nice with my new monogrammed napkins!
Supplies:
Cheap Plain Napkin Rings(you could even use an old piece of PVC pipe cut into 1 1/2 inch lengths. My rings were wood and found for $.25 a piece at a discount store.)
Starfish (2-3 inch- Seashells will also work)
Twine
Hot Glue Gun/Glue Sticks
Scissors


First, add a dab of hot glue to the inside of the ring and attach the start of your twine. Next bring the twine up over the the edge and begin wrapping it around the ring opening. Add small 1-2 inch beads of hot glue around the ring, following directly underneath the previous layer of twine. Wrap around and around, pressing each section of twine flush up to the previous one until you come to the other end of the ring. Finish the same way you started- cut the twine and add another dot of hot glue on the inside of the ring to secure.

Once the glue is dried, if you have bristly twine like I did, give it a haircut to trim away all the fly away pieces and then add a dab of hot glue to the back of your starfish and adhere it to the ring. That's it!


My finished table:


Monday, September 14, 2009

Weekend Project

So I've had this antique mahogany mirror for about 15 years. It was free, and while it had been stripped of its paint and nicely refinished, the mirror itself had some damaged spots and it was entirely too dark for use our new house. Based on those facts, I decided it wouldn't be a sin to paint and use some hot glue on the thing. Here it is after 3 coats of primer

And here are some after shots, with it hanging over my fireplace in our living room. Sorry I wasn't better about taking "in process" photos!


I did it using white/pearl seashells, starfish, sand dollars, sea glass and beach pottery. It measures 3 feet wide, 2 1/2 feet tall and 4 inches thick.

What do you think?

Wednesday, April 1, 2009

I've been a busy beaver!

So last night I finished the last of my really big projects- I was making 4 "handbags" -for lack of a better word- to be carried down the runway in a fashion show. The show is featuring ocean inspired lingerie and the models will carry giant versions of my Christmas ornaments.

I made two 6" round seashell kissing balls with pearl embellishments, a 5 inch round English Channel sea urchin adorned with pearls and a 7 inch armored starfish, again adorned with pearls.


In the photo you can also see the necklaces I've been working on, another wreath I made and part of a picture frame that I turned into an earring display.

Some close up shots of the finished pieces:


I think these could all really be cute for a beach wedding too- instead of flower girl baskets or even in lieu of bouquets for the bridesmaids- the starfish perhaps as pew decorations if it's a church wedding?... hmmm the wheels are spinning now!

Stay tuned to check out the new boutonnieres I'm working on for another client!