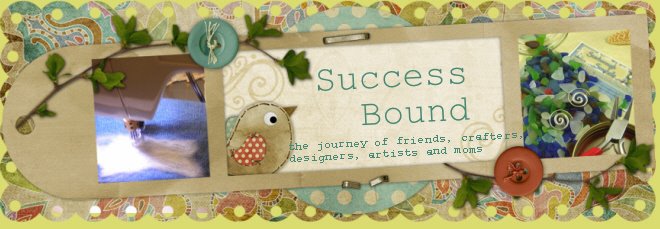
Decided to get into the holiday spirit a little today and make some cute earrings that would be perfect stocking stuffers, gifts for teachers, babysitters, etc. Available at Scarborough Seashells
Saturday, November 28, 2009
Thursday, November 26, 2009
Holiday at the beach
Thought I would share a few simple craft projects that I came up with to set my Thanksgiving dining table this year. If you're like me and love everything beachy, these will work well for any celebration, they are by no means "Thanksgiving Only", in fact, they're not really Thanksgiving-y at all! Enjoy and Happy Turkey Day! PS- sorry there are so many pictures, I tried to do step-by-step images for everyone.
Craft #1: Decorative Seashell Votive Holders. These are SO simple and really added a nice finishing touch to my table.
Supplies:
Glass Votive Holders (purchased for $.39 each at a discount store)
Twine
Seashells
Hot Glue Gun/Glue Sticks
Scissors


First, wrap the twine around the top of the holder once, tying it in a knot to secure. You can also use a dot of hot glue if it's sliding around on you. Then simply take the ends of the twine and wrap around the holder once more in each direction giving yourself a total of 3 wraps. Give your twine a trim, hot glue a seashell in the center to cover the knot and you're done!


Craft #2: Starfish Napkin Rings. These are a bit more time consuming than the votive holders but equally as simple and they really looked nice with my new monogrammed napkins!
Supplies:
Cheap Plain Napkin Rings(you could even use an old piece of PVC pipe cut into 1 1/2 inch lengths. My rings were wood and found for $.25 a piece at a discount store.)
Starfish (2-3 inch- Seashells will also work)
Twine
Hot Glue Gun/Glue Sticks
Scissors


First, add a dab of hot glue to the inside of the ring and attach the start of your twine. Next bring the twine up over the the edge and begin wrapping it around the ring opening. Add small 1-2 inch beads of hot glue around the ring, following directly underneath the previous layer of twine. Wrap around and around, pressing each section of twine flush up to the previous one until you come to the other end of the ring. Finish the same way you started- cut the twine and add another dot of hot glue on the inside of the ring to secure.

Once the glue is dried, if you have bristly twine like I did, give it a haircut to trim away all the fly away pieces and then add a dab of hot glue to the back of your starfish and adhere it to the ring. That's it!


My finished table:


Sunday, November 22, 2009
A couple more quick before and afters
I did some side by side comparison pictures of the before and after of our living area in the new house. Enjoy!


Saturday, November 21, 2009
Before and After- Redoing our 1970's Ranch House
So I mentioned a few months ago that Ed and I bought our first house this summer. It's a 1971 ranch house and much of it was still dressed in the oh so lovely decor befitting a house from that era. Dark panelling, even darker wood kitchen cabinets, hideously stained and stinky carpet, you get the picture. While we still have a ways to go, we have accomplished a lot on our "to do" list already and I'm finally ready to show off our progress!
The day we closed, we took our parents and the boys over to check out the new place. These photos are actually the realtor's images from the online listing. I especially love the "tree paintings" the previous owner left for us. These are actually boarded up windows. They built a garage addition on the side of the house, so they couldn't keep the window there any more, but I guess they thought the window framing should stay put. The front window was once 3 smaller windows and they replaced it with one picture window and boarded up the left portion since the new picture window wasn't as large as the 3 former windows had been. Clever. For now one hides behind curtains and the other is just painted white to blend in... I think it will become a mosaic project.


Lovely, eh? The very first thing I did was knock out the gorgeous spindly things in that cutout window that looks into the kitchen. Then came paint. LOTS and LOTS of paint. 3 coats of primer and 4 coats of latex to be exact...


Next we replaced the 38 year old sliding glass door and the (very red, very poorly painted)front door. The old slider:
The new doors:

Finally we tore up the carpet, the vinyl kitchen floor (and the vile linoleum that was underneath it) and put down wood laminate flooring all the way through. Here are some pictures during the flooring process. The first two are the disgusting carpet the night before we started the floors. We thought the cats might enjoy a catnip party to say farewell to the nasty thing.


We still have some light fixtures to switch out, a new stove and microwave to purchase and a few other odds and ends, but all in all, the main living space is coming together fairly well and much like I imagined it would be. What do you think?


The day we closed, we took our parents and the boys over to check out the new place. These photos are actually the realtor's images from the online listing. I especially love the "tree paintings" the previous owner left for us. These are actually boarded up windows. They built a garage addition on the side of the house, so they couldn't keep the window there any more, but I guess they thought the window framing should stay put. The front window was once 3 smaller windows and they replaced it with one picture window and boarded up the left portion since the new picture window wasn't as large as the 3 former windows had been. Clever. For now one hides behind curtains and the other is just painted white to blend in... I think it will become a mosaic project.


Lovely, eh? The very first thing I did was knock out the gorgeous spindly things in that cutout window that looks into the kitchen. Then came paint. LOTS and LOTS of paint. 3 coats of primer and 4 coats of latex to be exact...


Next we replaced the 38 year old sliding glass door and the (very red, very poorly painted)front door. The old slider:

The new doors:


Finally we tore up the carpet, the vinyl kitchen floor (and the vile linoleum that was underneath it) and put down wood laminate flooring all the way through. Here are some pictures during the flooring process. The first two are the disgusting carpet the night before we started the floors. We thought the cats might enjoy a catnip party to say farewell to the nasty thing.


We still have some light fixtures to switch out, a new stove and microwave to purchase and a few other odds and ends, but all in all, the main living space is coming together fairly well and much like I imagined it would be. What do you think?


Friday, November 20, 2009
Decking the Halls
I worked this Wednesday at The Shops at Fabian House, and we were decorating for Christmas. Normally they don't get the Christmas spirit there until after Thanksgiving, but Thanksgiving is very late this year, and we had a lot to do!
They put up the tree earlier in the week, so it was all ready for my handmade ornaments. Please excuse my lack of tree photography skills, this has been an issue for me for years.
 There is a cool mix of the handmade stuffed ornaments, the quilted balls, domino ornaments, vintage glass, handmade cross stitched ornaments and some crickets that are scattered about for good luck! (Not real crickets, they are made from reeds or something similar.) I hear there are Polish Pottery ornaments in the shop that will get added to the tree this week.

Half of the ornaments I brought went on the tree, the other half are displayed on this tray next to the tree.

Ruth made a bunch of ornaments using strips cut from an old picture book that was falling apart. You can see one in the top left corner of this photo. They look great hanging from the ceiling of the cafe, which is where the bookshelves are in the store.
Bob hung nice pointsettia garlands over the doorways, and then about 300 lights up the staircase. All this decorating helped me get over a major case of the bah humbugs I was feeling. I can't wait to see what else is happening in there when I go next week!

They put up the tree earlier in the week, so it was all ready for my handmade ornaments. Please excuse my lack of tree photography skills, this has been an issue for me for years.
 There is a cool mix of the handmade stuffed ornaments, the quilted balls, domino ornaments, vintage glass, handmade cross stitched ornaments and some crickets that are scattered about for good luck! (Not real crickets, they are made from reeds or something similar.) I hear there are Polish Pottery ornaments in the shop that will get added to the tree this week.
Half of the ornaments I brought went on the tree, the other half are displayed on this tray next to the tree.

Ruth made a bunch of ornaments using strips cut from an old picture book that was falling apart. You can see one in the top left corner of this photo. They look great hanging from the ceiling of the cafe, which is where the bookshelves are in the store.
Bob hung nice pointsettia garlands over the doorways, and then about 300 lights up the staircase. All this decorating helped me get over a major case of the bah humbugs I was feeling. I can't wait to see what else is happening in there when I go next week!
Friday, November 13, 2009
Tis Almost the Season!

Next week, the Christmas tree is going up in The Shops at Fabian House, so I need to have some ornaments ready to go. Obviously, I still have a lot of work to do! My partner in Chickadee Friends Studio, Karen, has been making a bunch of ornaments as well, I can't wait to see them all tomorrow.
I can't wait to see all of these on the tree!
Tuesday, November 10, 2009
A Special Veterans Day
Hello My Family and Friends!
Below is a copy of the Achievement Award, that Jared, my oldest nephew, received during drill last Saturday. There was a medal and a ribbon that went along with the certificate. I realized how very fortunate we are to have Jared home, safe and attending school like many other young men! We have much to be grateful for this day. When Jared showed this to us he said, "I seldom get excited about anything, but this mattered."
And it matters to us! We are very proud of all of the veterans in our family, who have kept us safe over the years. This year we add Jared to that list!
Thank you, Jared. Know you are loved!

Friday, November 6, 2009
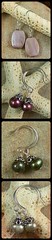
New Jewelry 11.6.09
A few new pieces made this week for Most Naturally in Narragansett. The green sea glass pieces are for the Habitat for Humanity of South County RI Annual Autumn Auction on November 14th.
Monday, November 2, 2009
The Sweetest Sound
Sitting in my bed yesterday afternoon, reading a book. I suddenly hear all three of my boys singing together... three little birds. Enjoy!
Subscribe to:
Posts (Atom)