Wednesday, December 30, 2009

WICKED!

Happy birthday to me! Ed doesn't typically get my a birthday gift because my birthday falls the day after Christmas and we just can't afford it. I'm perfectly okay with this, we've done it for years and we always celebrate early in the new year. So this year he got me good when he handed me my card and inside it I found two tickets to go see WICKED!

If you haven't heard, here's the scoop:

Long before Dorothy drops in, two other girls meet in the Land of Oz. One, born with emerald green skin, is smart, fiery and misunderstood. The other is beautiful, ambitious and very popular. How these two unlikely friends end up as the Wicked Witch of the West and Glinda the Good Witch makes for the most spellbinding new musical in years.

WICKED, the untold story of the witches of Oz, features music and lyrics by Stephen Schwartz (Godspell, Pippin, Academy Award-winner for Pocahantas and The Prince of Egypt) and book by Winnie Holzman ("My So Called Life", "Once and Again" and "thirtysomething"), and is based on the best selling novel by Gregory Maguire. With musical staging by Tony Award winning Wayne Cilento (Aida, The Who's Tommy, How to Succeed...) WICKED is directed by 2003 and 2004 Tony Award-winner Joe Mantello (Take Me Out, Frankie and Johnny in the Clair de Lune, Glengarry Glen Ross.)

So this Sunday night, I'm going to the theater! I've got a real official grown up date night with my hubby- go me! :)

Sunday, December 27, 2009

Woven Wonders


woven fabric 1
Originally uploaded by magscrafts
A few weeks ago, Karen (my partner in Chickadee Friends) and I went to an astounding exhibit of woven glass art pieces. Examples of the woven glass can be seen here. The artists are named Markow and Norris. Anyway, this exhibit was so wonderful, neither of us can get it out of our head.

Fast forward to Christmas, and I get an electric rotary cutting machine, which cuts strips galore with no muscle power needed from me. So tonight I cut a ton of strips from fabric in an assortment of rainbow colors, and wove them together to make a new fabric. Before I did my weaving, I pinned some parchment onto a board, and then layered some Mistyfuse fusible web, then pinned my white strips vertically. I wove my colored strips in, pinned the ends, and then ironed the whole thing to my Mistyfuse. I plan to cut this up and use it on some pieces I am doing for an art swap.

I want to play with different textures with this method too.

Wednesday, December 23, 2009

Upcycling can lead to pretty gift wrap!


To continue on with my theme this Christmas, I decided I'd try to make gift wrap that had a beachy feel to it. I was able to use a lot of stuff that had previous lives and "upcycle" it into cute little bundles that I hope my family and friends will love receiving! The brown paper is not actually kraft paper that I purchase but is, in fact, the brown paper they sometimes put at the center of your gift wrap roll instead of a cardboard tube. The bows are made from remnants of raffia I had in the house and my never ending ball of twine that I use for practically everything that needs tying. I made gift tags out of seashells and tiny sand dollars. I simply drilled a hole to attach them and wrote the recipients name on the backside. :)

I think this is the last post before Christmas since my family is arriving from NC bright and early tomorrow morning. Have a wonderful holiday weekend, everyone!

Tuesday, December 22, 2009

Stitch Witchery Stocking Project

AKA my version of a no-sew stocking.

After several frustrating hours searching online for stockings worthy of being called "beachy" and finding nothing but a scant one or two ridiculously priced at close to $200 a piece, I decided I'd make my own. At first I thought I might attempt to cross stitch some beachy like items onto premade stockings, but then smacking myself into the realization that I don't cross stitch and have no time to learn, I tossed that option off the list. Then I decided I'd hunt for some pretty white stockings and embellish them- easier said than done. All the white stockings I found (which weren't many) were either those plain felt ones you can buy for less than $1 or they were furry- not exactly my style. I searched Etsy and eBay thinking maybe someone had done my job for me and made something I could use- yes indeed, I found some pretties but again they were too costly for my family of five. I'm looking to do this on the cheap, not break the bank! $25-$50 a stocking is not in my budget this year.

So long story short, I'd about given up hope of finding anything I could use when I wandered into my local Christmas Tree Shop (those who don't have these locally, don't be fooled by the name- while they DO carry holiday items, this is not the main theme of the store- I was actually buying curtains for my bedroom that day). For the heck of it, I wandered through the Christmas section to see if anything caught my eye- low and behold there were FIVE and only FIVE creamy white stockings in a satin material with a diamond pattern stitched across the fronts. Only problem was a BIG red bow. But for $2.99 a pop, that could be handled!

So I grabbed them up and brought them home and began to plan. At first I thought I'd just replace the red ribbon with a color better suited for my house- hard to do, the red ribbon is more than 5 inches wide, which is difficult to find and since I don't own a sewing machine, I'd have to rip the seams apart and then resew by hand to remove all traces of the red- no time for that. My solution- jute fabric. It's the perfect color, it has a definite beachy feel about it and when paired up with the fancier cream colored stocking it totally has that "shabby beach chic" look! Okay, so here's the specifics- I went to JoAnn and bought 1/2 a yard of the jute for $1.50 and a roll of 3/4" Stitch Witchery (iron on adhesive tape used for hemming) with a 50% off coupon for $1.14. Total spent so far $18.82, not bad.

First step was to cut off the big red bows and trim back as far as I could to the stitching without actually undoing any of it- remember, I'm not sewing here.

Next, I measured the size of the jute I'd need to fit inside the stocking and cuff over the top long enough to cover the red bits still showing on the edges. Added length for my hem and then cut.

Then I followed the directions for use on the Stitch Witchery package- basically you fold over and iron your fabric where you want your hem to be, then cut a strip of the tape and slip it into the fold and then iron it to "hem". I did this along the top and bottom of the fabric.


Once I had that done, I folded the fabric in half -right sides facing in- and made a mark with sharpie down the raw edge where I wanted to join the pieces of fabric together and then followed that line for placing my tape.
The end result is a tube shape.


I turned the stocking inside out and used a tiny bit of the Stitch Witchery to adhere the jute to the inside of the stocking. I flipped everything back to the correct side, folded down the cuff
and finally, I added a twine loop for hanging (okay so this little bit I actually stitched on, it's not 100% "no-sew")

and a seashell for a bit of decoration.
Each person has a different shell so we can tell who's stocking is who's.


Since I had the twine and the seashells in the house, my final cost for 5 custom stockings was less than $20! This same idea can be modified to fit any sort of theme- you can use any stocking that matches your decor (I've even seen some cute ones at Dollar Tree!) Get a coordinating fabric and then embellish with something that emphasises your theme- you could get little ornaments with snowmen, Santas or angels- even candy canes- how cute would that be?! And the great thing is, because it's so affordable you can change them year to year as your decor changes!

Happy Holidays!

Wednesday, December 16, 2009

The Problem... and the Solution!

I've mentioned before that the house we bought came complete with a weird tree painting/window thing. Basically, the previous owners built an addition on the side of the house and boarded up a window, but when they did it, they kept the window casing and placed drywall in the center of it instead of panelling over it like the rest of the room. Then to make it less of an eyesore, they decided to paint it with a *ahem* lovely white tree branch.

Our short term solution was just to paint it white like the rest of the walls and let it fade away while I thought about what to do with it.

While out walking recently, I got an idea to do a wall of photos and to try to do it on a budget!
I went to the Dollar Tree and grabbed 11 frames in various sizes and added to it a frame I have had in my basement waiting for a new life for some time now.


Next I grabbed a can of turquoise paint left over from when I painted the workbench in my old studio space.
Two coats of paint and they're looking good!

I printed out the pictures on photo paper I got for $3 with a coupon and used a sepia tone to make them more cohesive. I printed out the "family" on some left over scrapbook paper.
The last part was figuring out a pleasing layout for the frames since I had a variety of sizes and couldn't make it symmetrical. The result:

For a grand total of $14.98 -including tax- my 4'x6' eyesore now has a purpose!

Tuesday, December 15, 2009

Breakfast with Santa!

Aidan came home with the 2009 "Parks and Rec" guide for holiday festivities in our town and there was a "Breakfast with Santa" event that he really wanted to go to. We decided it was a great idea for something reasonably priced to do as a family. He was so excited that he ran around the house singing "Parks and REC! (emphasis on REC!), Parks and REC!" constantly. LOL.

So we went to the Coast Guard House in Narragansett last Saturday and paid $20 for our family of five- money to our local Lions Club. We had eggs, bacon, homefries, french toast, coffee and juice- PLUS pictures with Santa. Can't be that with a stick! :)

Sunday, December 13, 2009

Cool 3D Paper Snowflakes Craft Project!

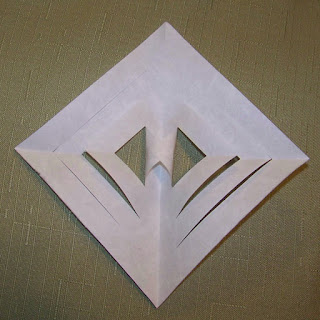
I found this tutorial on Attempting to be Domestic and thought they were worth a shot. So simple to do and they're really quite lovely- good bang for the (minimal) buck!

Supplies:

-6 square pieces of paper per snowflake. You can use printer paper or do like I did and use scrapbook paper. I found a pretty rice paper on sale at AC Moore- my total cost for the project was $3.
-Scissors
-Tape
-Ruler
-Pencil

1. If your paper is not square, cut into squares- I decided to make 5 inch squares which yielded me 2 squares per sheet, so I used 3 rice paper sheets per snowflake.

2. Next fold your square into a triangle, then fold the triangle in half to form a smaller triangle.


3. Once you have all your folds made, take your ruler and tick off 3 small marks around 1/2 inch apart on the double folded edge of the triangle for making your cuts. I just measured one then used it as a template for all my others.

4. Now cut into the triangle (starting at each of your tick marks) towards the single folded side and stop about 1/2 an inch before you reach the edge.

5. Next, unfold your triangle to reveal the square with all it's cuts.

6. Now take the two smallest triangle cuts in the center of the square and fold them in towards each other and secure with tape.

7. Flip your square over, take the next two largest triangle cuts and fold those in towards each other and again, secure with tape.

8. Continue flipping the paper over and folding in each triangle section until it is complete. You need 6 completed sections per snowflake.


9. Now secure the sections together with tape at the inner point and at the "elbow" section of each piece.

10. Do this for each of the 6 sections and your snowflake is completed! I hung mine with some fishing line in my front window. So pretty!

Monday, December 7, 2009

Genuine Red Sea Glass Pendant

Just in time for Christmas! A rare red sea glass piece, bezel set in sterling and fine silver. I have cut out the back side to allow light to shine through. A truly special way to wish someone you love a wonderful holiday season! This is a one of kind piece, available now on
my website.

Saturday, December 5, 2009

What's on My Bench

I was happily moving along last week, making assorted earrings to take to The Shops at Fabian House, when I realized I had NO ear wires. So since it is snowy, and not a good day for the outing I had planned, I went into my lair to make some earwires.

I made 2 kinds- the rounded ones like these:
And more traditional hooks like these:
(I like to melt a ball of silver on the loop, but I have no pictures of those, I must have sold them all in person!)

Here are some photos of the work in progress:

Melted balls onto the ends of some lengths of wire and soaked them in some "pickle".


For the round wires, I form a large coil on a huge knitting needle, then cut off circles, form a loop on one end.


I file the ends of either kind of wires, so that they do not irritate the wearer!


I bought this mini jig for forming all the hook shaped ones the same!


All of the wires are in the tumbler now to get hardened and shiny.